前两天,我在开源中国的微信公众号看到新浪微博的轻量Rpc框架——Motan开源了。上网查了下,才得知这个Motan来头不小,支撑着新浪微博的千亿调用,曾经在2014年的春晚中有着千亿次的调用,对抗了春晚的最高峰值。
什么是Motan 2013 年微博 RPC 框架 Motan 在前辈大师们(福林、fishermen、小麦、王喆等)的精心设计和辛勤工作中诞生,向各位大师们致敬,也得到了微博各个技术团队的鼎力支持及不断完善,如今 Motan 在微博平台中已经广泛应用,每天为数百个服务完成近千亿次的调用。” —— 张雷
微博的Motan RPC服务,底层通讯引擎采用了Netty网络框架,序列化协议支持Hessian和Java序列化,通讯协议支持Motan、http、tcp、mc等,Motan框架在内部大量使用,在系统的健壮性和服务治理方面,有较为成熟的技术解决方案,健壮性上,基于Config配置管理服务实现了High Availability与Load Balance策略(支持灵活的FailOver和FailFast HA策略,以及Round Robin、LRU、Consistent Hash等Load Balance策略),服务治理方面,生成完整的服务调用链数据,服务请求性能数据,响应时间(Response Time)、QPS以及标准化Error、Exception日志信息。
Motan 属于服务治理类型,是一个基于 Java 开发的高性能的轻量级 RPC 框架,Motan 提供了实用的服务治理功能和优秀的 RPC 协议扩展能力。服务发现 :服务发布、订阅、通知高可用策略 :失败重试(Failover)、快速失败(Failfast)、异常隔离(Server 连续失败超过指定次数置为不可用,然后定期进行心跳探测)负载均衡 :支持低并发优先、一致性 Hash、随机请求、轮询等扩展性 :支持 SPI 扩展(service provider interface)其他 :调用统计、访问日志等
Motan 可以支持不同的 RPC 协议、传输协议。Motan 能够无缝支持 Spring 配置方式使用 RPC 服务,通过简单、灵活的配置就可以提供或使用 RPC 服务。通过使用 Motan 框架,可以十分方便的进行服务拆分、分布式服务部署。
关于Motan的更多内容可参考:http://h2ex.com/820 https://github.com/weibocom/motan
简单调用示例 参照github中wiki,可以快速的跑一跑motan,提前感受一下,由于Motan刚开源,很多东西还不完整,我个人在这中间也遇到很多坑,后面一一介绍。我按照wiki介绍,先创建maven项目motandemo,
添加pom依赖 1 2 3 4 5 6 7 8 9 10 11 12 13 14 15 16 17 18 19 20 21 22 23 24 25 26 27 28 29 30 31 32 33 34 35 36 37 38 39 40 41 42 43 44 45 46 47 48 49 50 51 52 53 54 55 56 57 58 59 60 61 62 63 <project xmlns ="http://maven.apache.org/POM/4.0.0" xmlns:xsi ="http://www.w3.org/2001/XMLSchema-instance" xsi:schemaLocation ="http://maven.apache.org/POM/4.0.0 http://maven.apache.org/xsd/maven-4.0.0.xsd" > <modelVersion > 4.0.0</modelVersion > <groupId > com.hjc.demo</groupId > <artifactId > motandemo</artifactId > <version > 0.0.1-SNAPSHOT</version > <packaging > war</packaging > <name > motandemo</name > <repositories > <repository > <id > spy</id > <name > 36</name > <layout > default</layout > <url > http://repo1.maven.org/maven2</url > <snapshots > <enabled > false</enabled > </snapshots > </repository > </repositories > <dependencies > <dependency > <groupId > junit</groupId > <artifactId > junit</artifactId > <version > 3.8.1</version > <scope > test</scope > </dependency > <dependency > <groupId > com.weibo</groupId > <artifactId > motan-core</artifactId > <version > 0.0.1</version > </dependency > <dependency > <groupId > com.weibo</groupId > <artifactId > motan-transport-netty</artifactId > <version > 0.0.1</version > </dependency > <dependency > <groupId > com.weibo</groupId > <artifactId > motan-registry-consul</artifactId > <version > 0.0.1</version > </dependency > <dependency > <groupId > com.weibo</groupId > <artifactId > motan-registry-zookeeper</artifactId > <version > 0.0.1</version > </dependency > <dependency > <groupId > com.weibo</groupId > <artifactId > motan-springsupport</artifactId > <version > 0.0.1</version > </dependency > <dependency > <groupId > org.springframework</groupId > <artifactId > spring-context</artifactId > <version > 4.0.5.RELEASE</version > </dependency > </dependencies > <build > <finalName > motan</finalName > </build > </project >
注意如果maven下载不下来可以去仓库直接搜,然后下载jar包,我在搭建的过程就遇到了jar包下载不下来的情况,可能是网络原因吧。http://mvnrepository.com/
1 mvn install:install-file -Dfile=<path-to-file> -DgroupId=<group-id> -DartifactId=<artifact-id> -Dversion=<version> -Dpackaging=<packaging>
确定pom.xml不报错之后再进行下面的步骤
为服务方和调用方创建接口 创建接口,服务方和调用方都使用这个接口FooService
1 2 3 4 5 6 7 8 9 10 11 12 13 14 15 16 17 18 19 20 package com.hjc.motan.server;import java.util.List;import java.util.Map;import com.hjc.motan.DemoBean;public interface FooService public String hello (String name) public int helloInt (int number1) public double helloDouble (double number2) public List<String> helloList (List<String> list) public Map<String, List<String>> helloMap(Map<String, List<String>> map); public DemoBean helloJavabean (DemoBean bean) }
服务方来实现这个接口的逻辑
1 2 3 4 5 6 7 8 9 10 11 12 13 14 15 16 17 18 19 20 21 22 23 24 25 26 27 28 29 30 31 32 33 34 35 36 37 38 39 40 41 42 43 44 45 46 47 48 49 50 51 52 53 54 55 56 57 58 59 60 61 62 63 64 65 package com.hjc.motan.server;import java.util.List;import java.util.Map;import org.springframework.context.ApplicationContext;import org.springframework.context.support.ClassPathXmlApplicationContext;import com.hjc.motan.DemoBean;public class FooServiceImpl implements FooService public static void main (String[] args) throws InterruptedException ApplicationContext applicationContext = new ClassPathXmlApplicationContext( "classpath:motan_server.xml" ); System.out.println("server start..." ); } public String hello (String name) System.out.println("invoked rpc service " + name); return "hello " + name; } public int helloInt (int number1) System.out.println("invoked rpc service " + number1); return number1; } public double helloDouble (double number2) System.out.println("invoked rpc service " + number2); return number2; } public List<String> helloList (List<String> list) System.out.print("invoked rpc service " ); for (String string : list) { System.out.print(string + "," ); } System.out.println(); return list; } public Map<String, List<String>> helloMap(Map<String, List<String>> map) { System.out.print("invoked rpc service " ); for (String key : map.keySet()) { System.out.print(key + ":[" ); for (String list : map.get(key)) { System.out.print(list + "," ); } System.out.print("]," ); } System.out.println(); return map; } public DemoBean helloJavabean (DemoBean bean) System.out.print("invoked rpc service " + bean); System.out.print("," + bean.getId()); System.out.print("," + bean.getName()); System.out.print("," + bean.getScore()); System.out.println(); return bean; } }
配置服务方暴露接口 在项目根目录(src/main/datasource)创建motan_server.xml,如下:
1 2 3 4 5 6 7 8 9 10 11 12 <?xml version="1.0" encoding="UTF-8"?> <beans xmlns ="http://www.springframework.org/schema/beans" xmlns:xsi ="http://www.w3.org/2001/XMLSchema-instance" xmlns:motan ="http://api.weibo.com/schema/motan" xsi:schemaLocation ="http://www.springframework.org/schema/beans http://www.springframework.org/schema/beans/spring-beans-2.5.xsd http://api.weibo.com/schema/motan http://api.weibo.com/schema/motan.xsd" > <bean id ="serviceImpl" class ="com.hjc.motan.server.FooServiceImpl" /> <motan:service interface ="com.hjc.motan.server.FooService" ref ="serviceImpl" export ="8002" /> </beans >
在这个过程中,我发现我的eclipse不能自动下载motan.xsd,这时候我只能手动配置,从motan-core的jar包中,找到这个schema文件,复制到任意位置,然后eclipse中,选择Window->Preferences->XML->XML Catalog->User Specified Entries,点击Add,输入Location和Key,按照如下图所示:
以上步骤完成之后,就可以启动Motan Rpc的服务方了,在FooServiceImpl中已经写好了main方法,右键run即可
配置调用方调用接口 在项目根目录(src/main/datasource)创建motan_server.xml,如下:
1 2 3 4 5 6 7 8 9 10 <?xml version="1.0" encoding="UTF-8"?> <beans xmlns ="http://www.springframework.org/schema/beans" xmlns:xsi ="http://www.w3.org/2001/XMLSchema-instance" xmlns:motan ="http://api.weibo.com/schema/motan" xsi:schemaLocation ="http://www.springframework.org/schema/beans http://www.springframework.org/schema/beans/spring-beans-2.5.xsd http://api.weibo.com/schema/motan http://api.weibo.com/schema/motan.xsd" > <motan:referer id ="remoteService" interface ="com.hjc.motan.server.FooService" directUrl ="localhost:8002" /> </beans >
调用方调用 创建Client类调用服务方的接口并输出
1 2 3 4 5 6 7 8 9 10 11 12 13 14 15 16 17 18 19 20 21 22 23 24 25 26 27 28 29 30 31 32 33 34 35 36 37 38 39 40 41 42 43 44 45 46 47 48 49 50 51 52 53 54 55 56 57 58 59 60 61 62 63 64 65 66 67 package com.hjc.motan.client;import java.util.Arrays;import java.util.HashMap;import java.util.List;import java.util.ArrayList;import java.util.Map;import org.springframework.context.ApplicationContext;import org.springframework.context.support.ClassPathXmlApplicationContext;import com.hjc.motan.DemoBean;import com.hjc.motan.server.FooService;public class Client public static void main (String[] args) throws InterruptedException ApplicationContext ctx = new ClassPathXmlApplicationContext( "classpath:motan_client.xml" ); FooService service = (FooService) ctx.getBean("remoteService" ); String ret1 = service.hello("motan" ); System.out.println(ret1); int ret2 = service.helloInt(110 ); System.out.println(ret2); double ret3 = service.helloDouble(11.2 ); System.out.println(ret3); List<String> list = new ArrayList<String>(); list.add("hello" ); list.add("motan" ); List<String> ret4 = service.helloList(list); for (String string : ret4) { System.out.print(string + "," ); } System.out.println(); Map<String, List<String>> map = new HashMap<String, List<String>>(); map.put("key1" , Arrays.asList(new String[] { "val1" ,"val2" })); map.put("key2" , Arrays.asList(new String[] { "val1" ,"val2" ,"val3" })); map.put("key3" , Arrays.asList(new String[] { "val1" ,"val2" ,"val3" ,"val4" })); Map<String, List<String>> ret5 = service.helloMap(map); for (String key : ret5.keySet()) { System.out.print(key + ":[" ); for (String tmp : map.get(key)) { System.out.print(tmp + "," ); } System.out.print("]," ); } System.out.println(); DemoBean bean = new DemoBean(); bean.setId(1001l ); bean.setName("motan bean" ); bean.setScore(99.998 ); DemoBean ret6 = service.helloJavabean(bean); System.out.print(ret6.getId()); System.out.print("," + ret6.getName()); System.out.print("," + ret6.getScore()); System.out.println(); } }
启动Client的main方法开始调用
输出结果 通过以上demo创建了server端和client端,分别启动服务方和调用方之后,查看控制台输出如下:
1 2 3 4 5 6 7 server start... invoked rpc service motan invoked rpc service 110 invoked rpc service 11.2 invoked rpc service hello,motan, invoked rpc service key3:[val1,val2,val3,val4,],key2:[val1,val2,val3,],key1:[val1,val2,], invoked rpc service com.hjc.motan.DemoBean@2cf3e1fd,1001,motan bean,99.998
调用方:
1 2 3 4 5 6 hello motan 110 11.2 hello,motan, key3:[val1,val2,val3,val4,],key2:[val1,val2,val3,],key1:[val1,val2,], 1001,motan bean,99.998
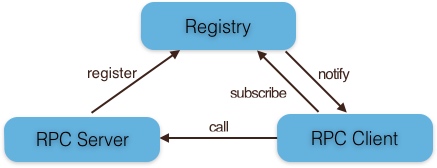
集群调用示例 实现集群使用只需要在上面的基础做一点稍稍的改变就可以,motan的集群与阿里的dubbo的原理类似,通过注册方、服务方、调用方三方来实现,三者关系图如下:
Server 向 Registry 注册服务,并向注册中心发送心跳汇报状态。
Client 需要向注册中心订阅 RPC 服务,Client 根据 Registry 返回的服务列表,对具体的 Sever 进行 RPC 调用。
当 Server 发生变更时,Registry 会同步变更,Client 感知后会对本地的服务列表作相应调整。
目前按照wiki说明,motan支持Consul和Zookeeper两种外部服务发现组件
添加pom依赖 在最上面,其实已经写出来了
1 2 3 4 5 6 7 8 9 10 11 12 <dependency > <groupId > com.weibo</groupId > <artifactId > motan-registry-consul</artifactId > <version > 0.0.1</version > </dependency > <dependency > <groupId > com.weibo</groupId > <artifactId > motan-registry-zookeeper</artifactId > <version > 0.0.1</version > </dependency >
在server和client的配置文件中分别增加registry定义 consul
1 <motan:registry regProtocol ="consul" name ="my_consul" address ="127.0.0.1:8500" />
zookeeper单节点
1 <motan:registry regProtocol ="zookeeper" name ="my_zookeeper" address ="127.0.0.1:2181" />
zookeeper多节点集群
1 <motan:registry regProtocol ="zookeeper" name ="my_zookeeper" address ="127.0.0.1:2181,127.0.0.1:2182,127.0.0.1:2183" />
在motan client及server配置改为通过registry服务发现 consul client
1 <motan:referer id ="remoteService" interface ="quickstart.FooService" registry ="my_consul" />
consul server
1 <motan:service interface ="quickstart.FooService" ref ="serviceImpl" registry ="my_consul" export ="8002" />
zookeeper client
1 <motan:referer id ="remoteService" interface ="quickstart.FooService" registry ="my_zookeeper" />
zookeeper server
1 <motan:service interface ="quickstart.FooService" ref ="serviceImpl" registry ="my_zookeeper" export ="8002" />
调用方调用服务 consul需要显示调用心跳开关注册到consul(zookeeper不需要)
1 MotanSwitcherUtil.setSwitcher(ConsulConstants.NAMING_PROCESS_HEARTBEAT_SWITCHER, true )
总结 我也是正好最近项目空闲,刚好又看到这么一则新闻,于是就动手了解了下,当然,我所做的只是浅层次的使用,至于更深层次的内容(如,跟dubbo等其他rpc框架的对比,集群上下线对zookeeper的影响等)还没来得及去研究,不过既然它曾经支撑过千亿的调用,那一定是经过实际运营检验的,作为搞技术的,也应该多去了解了解开源的东西,这里我想说一句,开源真好!https://github.com/hjcenry/motan-demo
我的个人博客开通啦,每一篇文章都在简书跟个人博客同步,地址是:http://hjcenry.github.io